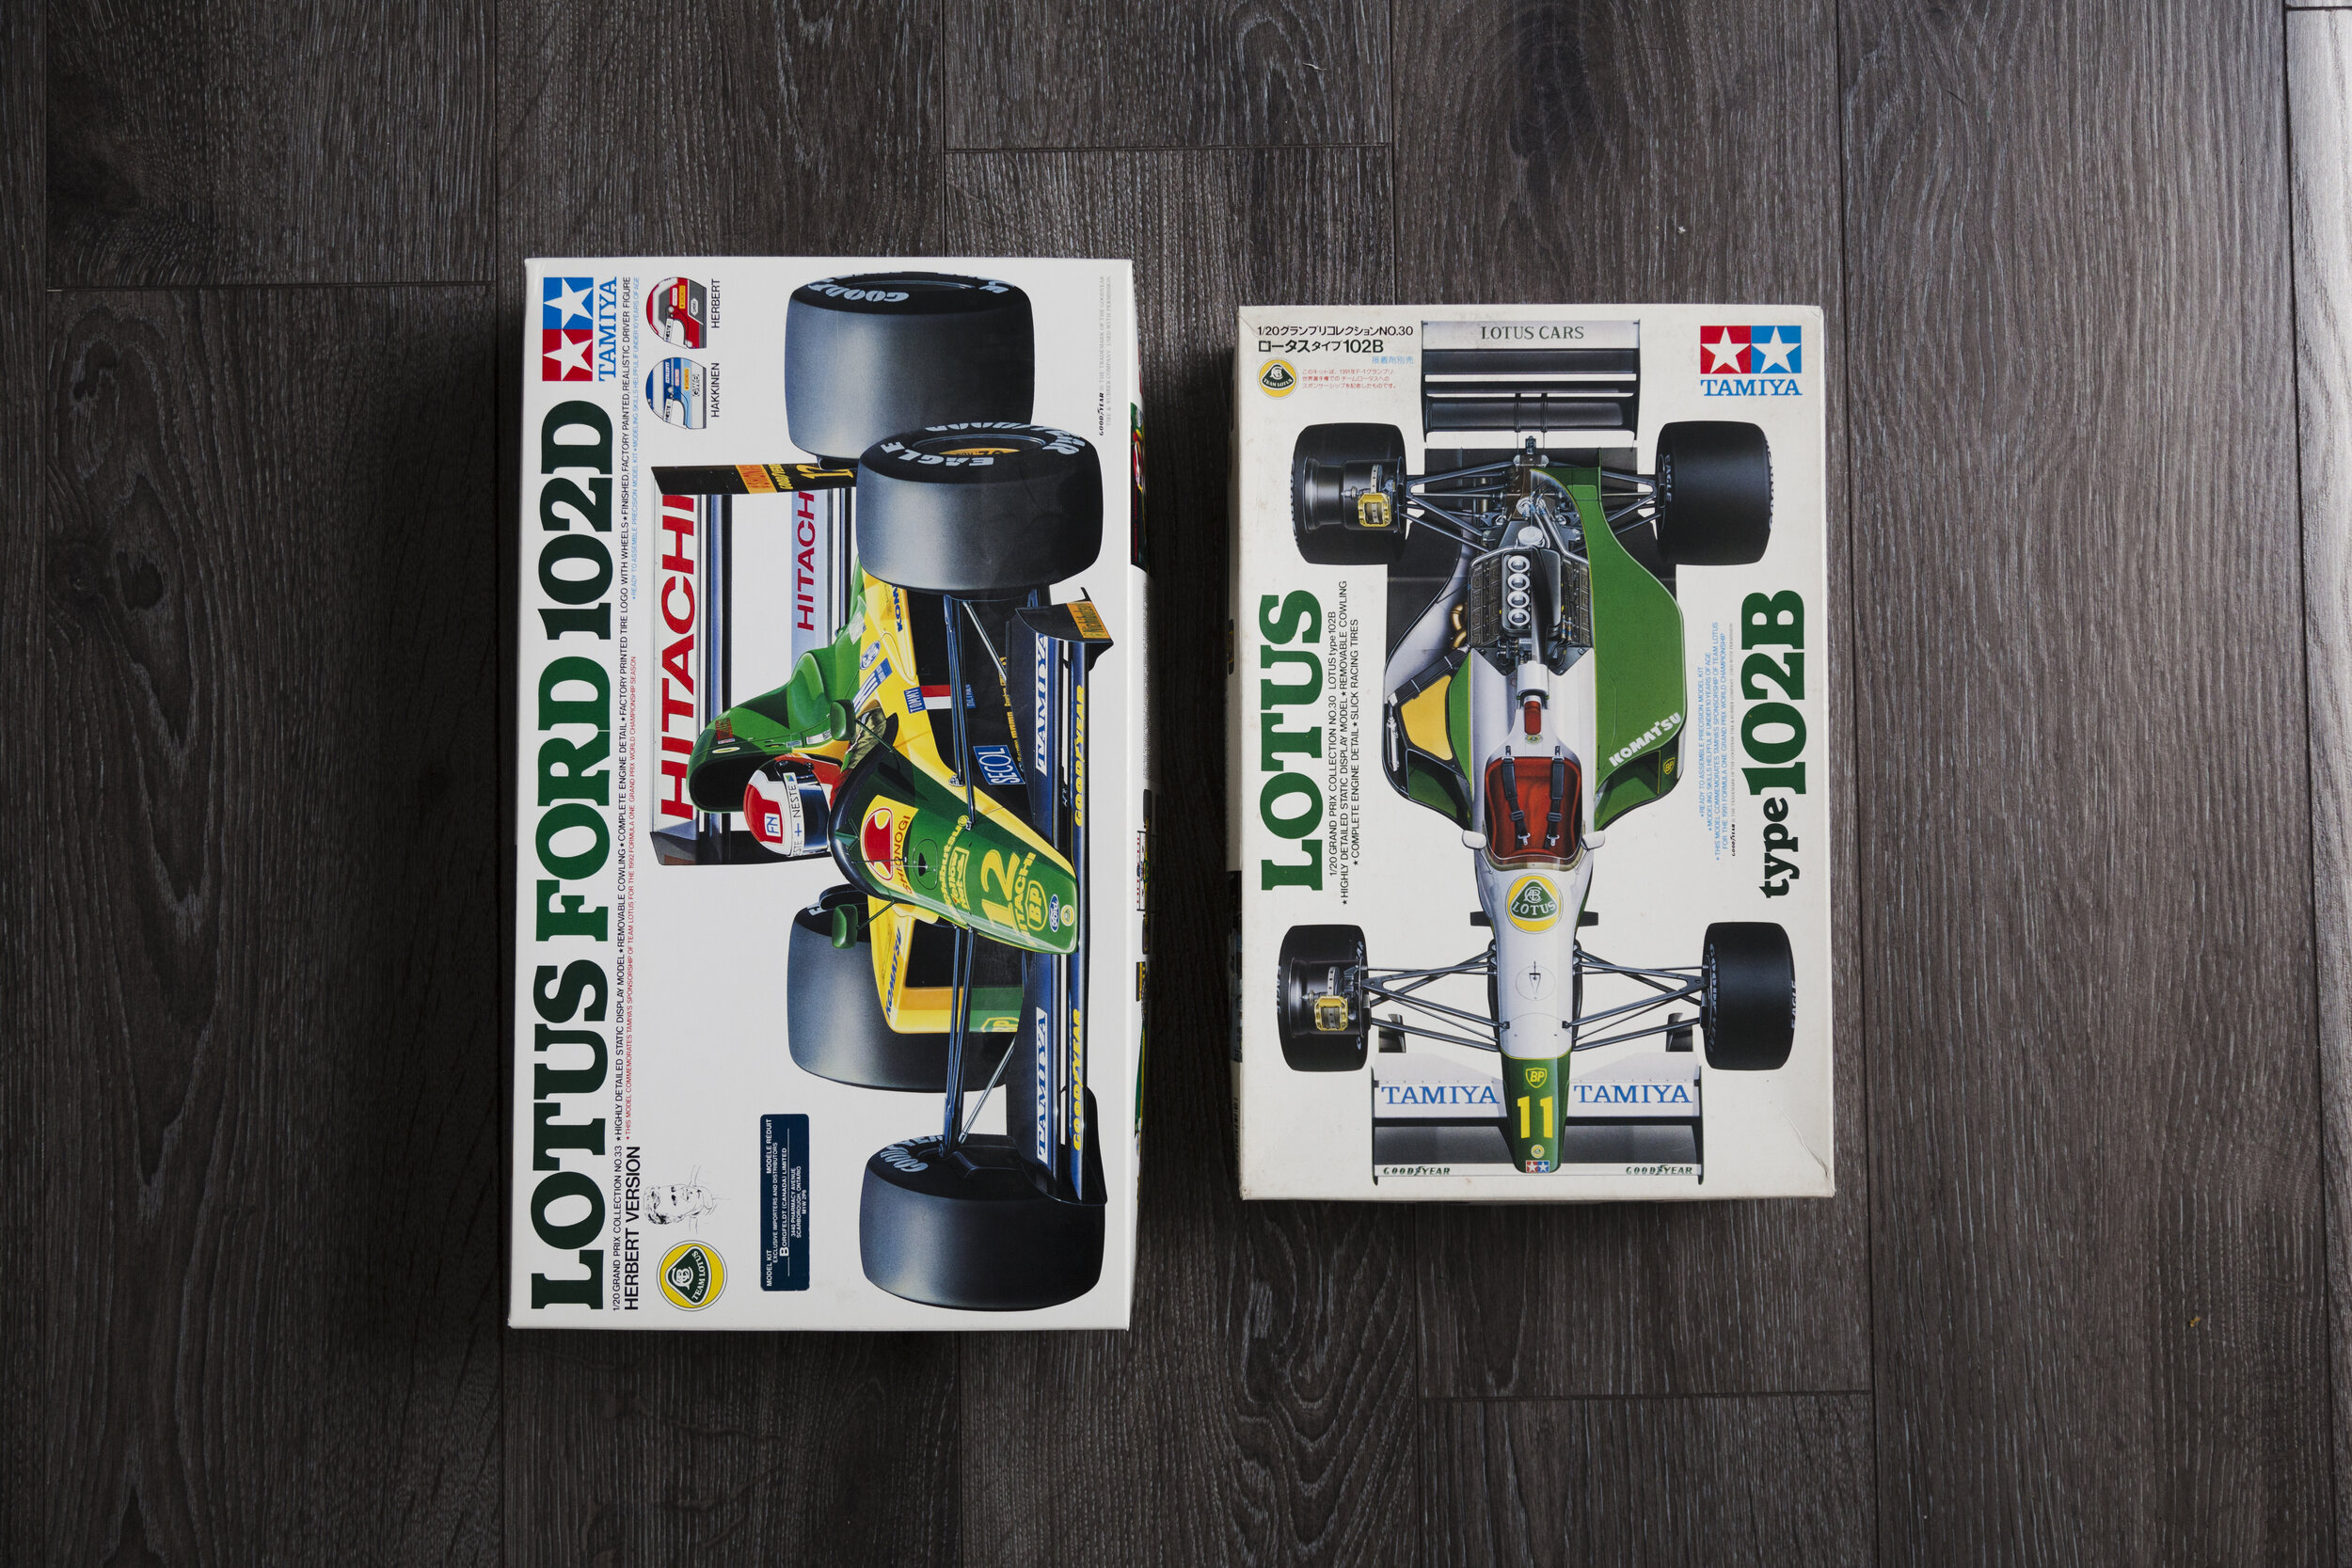
Tamiya 1/20 Lotus 102B & Lotus 102D Double Build
Tamiya 1/20 plastic kits.
Building Tamiya’s 1/20 Lotus 102B and Lotus 102D, driven by Mika Häkkinen in 1991 and 1992 respectively.
These builds panned September 2018 - December 2019. I have reposted the original WIP thread here.
Started these kits a while ago and have been very time consuming. I've been taking pictures along the way but have been too lazy to create a post. Photos won't necessarily be chronological.
I'm going to be doing full detail only because of the reference material very generously put together by Steffen_T on F1M.com. Otherwise I probably would've just done curbside because of how awful the engine cover fit is.
I’ll be using full Studio27 CF Decals and PE sets. The 102B will be painted with Zero Paints Pure Brilliant White and the 102D will be using Tamiya TS-16 and Zero Paints 102D colour set. Decals are very old on both kits so the 102B will be using "Vector Magic" decals and the 102D decals by Shunko.

For whatever reason S27 only markets a PE set for the 102B kit, even though every single piece is usable for the 102D kit as well.
At one point they were both progressing very smoothly until the 102D decided it would be one of those kits where everything that can go wrong will go wrong (the 102B would soon join it in this respect).


The 102D had to be stripped twice with isopropyl alcohol because I couldn't get the finish I wanted to with a Tamiya rattle can. Just as well since I forgot to add the little triangle aero device(?) in front of the cockpit of the 102D. After the second stripping I decided I would try my hand at doing modifications, of which I had no experience with at the time, just to further differentiate the 102D from the 102B.
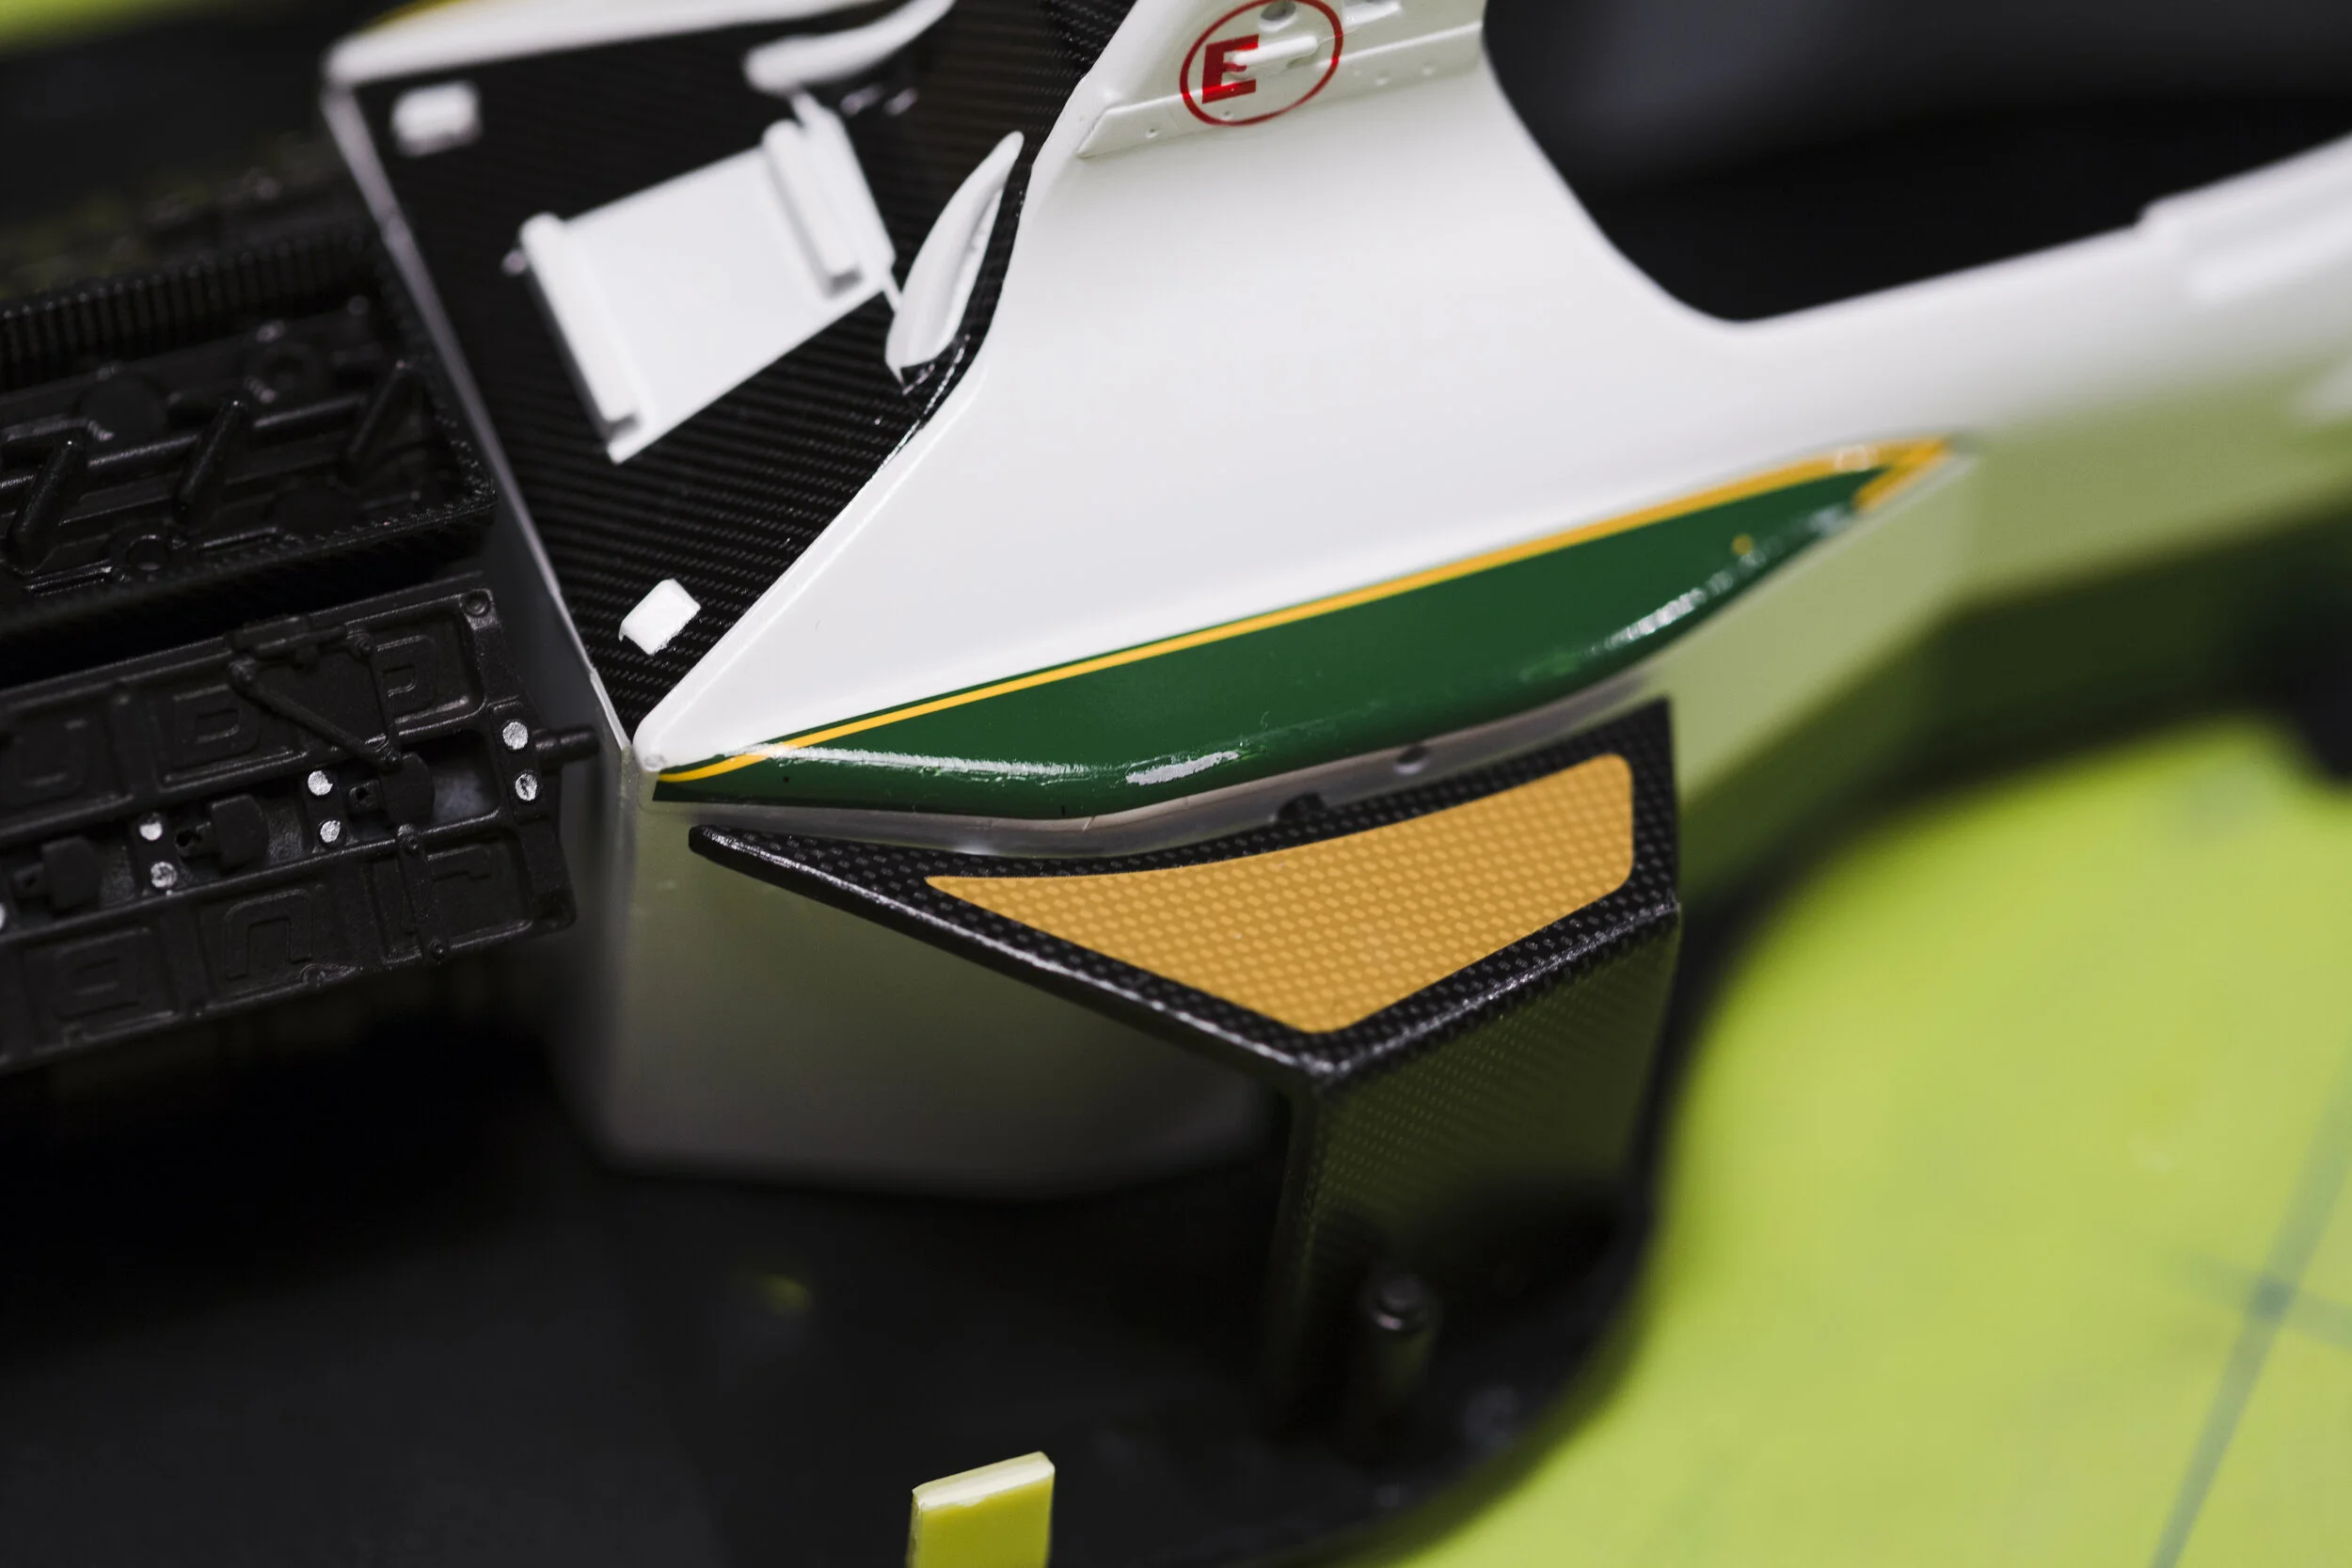
To replicate Mika Häkkinen’s 102D as it ran at the 1992 Brazilian Grand Prix, I cut the right sidepod opening out.


Meanwhile the 102B continued smoothly to decals. The Vector Magic decals are quite good in that they continue to be workable for a very long period of time, allowing for perfect placement. I'd say fit is only okay, but can be manipulated to perfection. Decals around the sidepod openings were definitely the hardest to position properly but I'm very happy with how they turned out.


As I mentioned earlier, the engine covers don't fit well at all. I think this is pretty universal with the 102 kits since both kits were purchased separately but fit poorly in the exact same way. To hold the engine cover down while applying decals that span both parts, I extended the tab that holds the engine cover in place, and drilled a hole through a moulded rivet, so it could be held in place with a wire. This would come back to bite me later.


Body decals completed.
So here's how pinning the engine cover ended up messing me up. Microsol went into the crack where the engine cover and body overlap, melting the decal and primer on the underside. When I separated the engine cover and the body, it tore the decal.

Back to the 102D: This time I applied TS-16 by decanting it and spraying with an airbrush and it went on much better.
Masking and painting was super intimidating to me, so of course I had to do a model that requires 3-4 colours in complex shapes. I must say everything went very well though. The Zero Paints light green looks pretty accurate.


Unfortunately the same can't be said for the dark green.... it came out almost black.


Thankfully I recovered it by going back over it with 2 thin coats of the light green.


And finally I painted the black on the body.
I decided to use the provided Shunko decals for the dark-yellow/orange parts of the livery. These also came attached with the dark-green portion for the lower side of the engine cover. The dark green from the decals doesn't quite match the dark green from the paint but I'll live with this.
It was at this point where I'd have to apply 2K clear, and also the point at which the problems started going off the deep end. It's still actually an ongoing process, but I've been running into non-stop contamination issues, even with washing the body thoroughly before painting. Some of it stems from dried Micro-sol residue, some from unknown reasons.


To fix the larger ones, I brushed some Future onto the "ulcer" looking crater just to even it out slightly, and provide a bit of buffer between my sandpaper and the decal.


At the same time with the 102D, I wanted to apply a tack coat of 2K before applying sponsor decals. I made a mistake when I tried sanding out a dust particle, and accidentally went into the base-coat. So I masked off that surrounding area, and applied the Zero light green, which immediately crazed the small area. Sigh. Then when I removed the masking tape it lifted off the tack-coat of 2K that was on top of the dark-orange stripe decals. Double sigh. I don't have pictures of it, but it was a lot of work to fix. Every touch up caused another problem.
All right so another week another nightmare setback. It's not all bad though so I'll start with the good:
Final application of 2K clear for the 102D engine cover went well. In the end it took a total of 5-6 coats of clear on the engine cover but thankfully the fit isn't "thickness critical" since it only sits on top of the monocoque. I will be moving forward with the floor and internals of this build.
Onto the very bad news:
At the same time as 102D, I tried to apply a coat of 2K clear to the 102B as well recovering from the contamination issue from the last update. As I tried to apply it, my airbrush let out a sputter and released some thick globs of clear onto the body. Not a huge deal, but a waste of 2 days of waiting for it to dry, sanding flat, washing, then re-applying. Yesterday I applied another layer of clear, and it went well. Just a few dust specks I had to polish out. I was polishing with ScratchX and my low-RPM dremel + wool buffing wheel (hand polishing 2K simply doesn't work) and was about to do my third and final pass. Things were finally about to come together. I slipped up and let a part of the spinning medal chuck of the dremel ding the engine cover, creating a small chip in the clear coat. Sigh. Fine. This is fixable. Out came the sand paper and I sanded the clear down flat and got ready to re-apply clear by soaking in detergent, giving it a scrub, rinsing off, and letting dry.
Applied a tack-coat, that went fine. Applied a slightly thicker coat which also went fine. Final wet coat? More fish-eyes and craters than I've ever seen in my life. It looked like the surface of the moon at one point with maybe 50-60 craters on just one side of the engine cover. I decided to flood with 2K to lessen the number of craters and to give me a bigger buffer to sand down flat. That's if I decide to even bother honestly, it might be a write off unfortunately. I'm pretty gutted.


Honestly I'm not sure what could've caused this. I thought it could've been residue from the polish, but the fisheyes appeared on the sides where I didn't polish. It couldn't have been contamination in my airbrush or plastic droppers since it applied perfectly fine to a wing piece I did at the same time. I'm thinking maybe I didn't rinse off the detergent properly, but I didn't really do anything differently this time. The one saving grace is that there are a lot of layers of clear so I can sand down quite aggressively without having to worry about going through it, but at this point I'm really wondering if it's worth continuing to pursue this 102B. It'll be very hard to sand down some areas and the panel lines are starting to look quite flooded after so many layers of clear. Stripping and re-starting isn't an option because I'm not willing to pay another $50 for a set of Vector Magic decals.
I sanded down the 102B engine cover both carefully and aggressively. I should be able to pull through, it'll probably take 2 more coats of clear plus sanding in between to fully even out the craters. That is assuming nothing goes wrong with the next two coats... the shape will be compromised a bit, especially around curves and edges. At this point if I can finish it I'll be happy enough. Still though, I won't be able to touch it until it gets warmer.
Long time no update! Since my last update almost a year ago things have gotten much smoother. I picked up on these again some time after I finished my W08. I did a lot of work without posting updates so I've made quite a lot of progress.
Comparison of moulded plastic fins on floor versus photo etched replacements:


I'd actually done work on the engine prior to my last update but never got around to posting it, but I just want to share some modifications I'd made to the engines and gearboxes to differentiate the two cars, as there were differences in real life.
Left is how the parts came OOB and right has modifications for the 102B radiator piping.
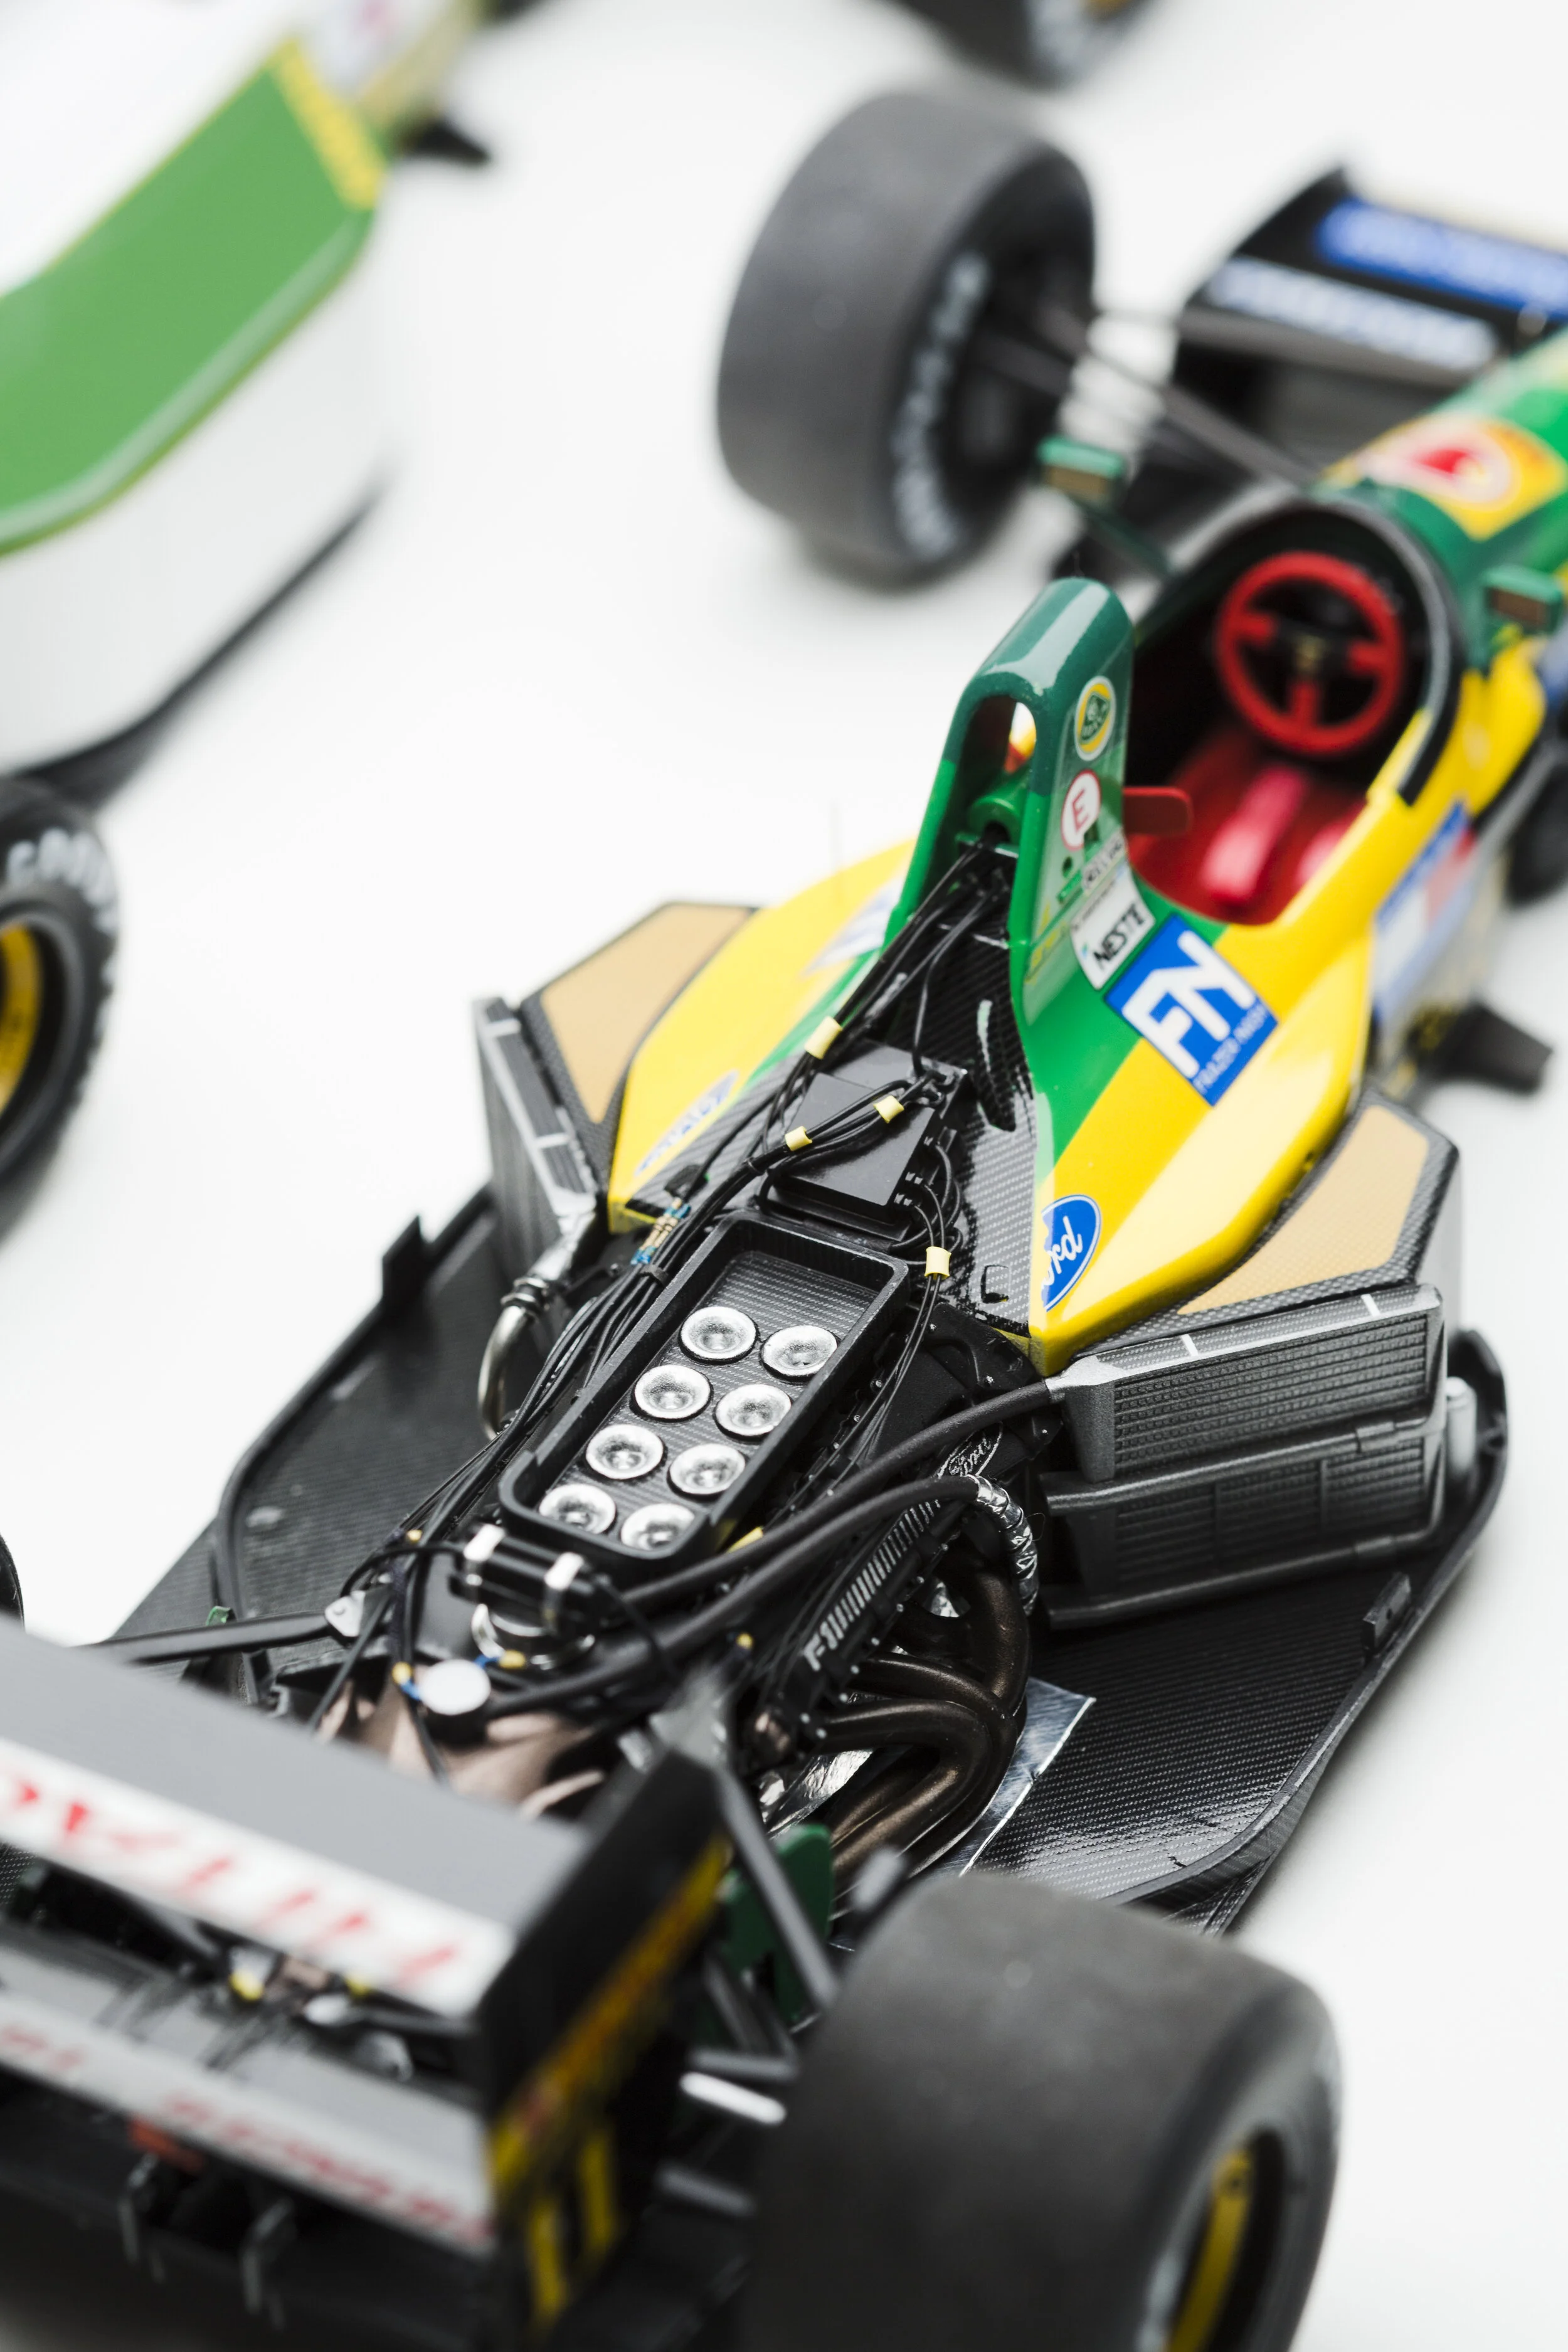
Rudimentary scratch build of some electrical components on the 102D:
Painted Black:
First time using A/N fittings. These are Top Studio’s resin hose joints. First they were primed, then painted in semi-gloss black, followed by a coat of Alclad aluminum. On top of that, a light coating of Alclad clear blue, and finally hand painted gold.
And this is where they’re at now:


I used aluminum foil for heat shielding on the 102D. The rear assemblies were pretty awful to assemble, as I hate those stupid Tamiya uprights that require you to squeeze a plastic ball through a small plastic hole. It can often require way more force than the plastic can tolerate, even after using pliers to squeeze the balls smaller. As a result, both of the drive shafts on my 102D snapped (well one was broken OOB but it re-broke), which is annoying because they're painted silver and very noticeable. Don't think I'll be able to repair them much. Just hope nobody notices.


All that's remaining on these is to finish wiring up the engine/gearbox/electrical box etc., finish radiator piping, create seatbelts, throw everything else together.
I experimented with the scratch built radiator piping, a highly necessary skill for Tamiya kits apparently. I used 1.6mm soldering wire for the pipes, and blue heat shrink for the hose connectors and thin wire for the ties, I just wish the heat shrink was thinner. I might experiment with stretching it out, but I'll save that for future models. For now this is passable for me.


I fixed the foil on the floors because I realized I had it backwards. I knew it was odd that the foil was everywhere BUT beneath the exhausts... Also gives a little opportunity to further differentiate the B from the D. I also realized too late that the green decals shouldn't have been put on the 102B floor, but they're sealed now so oh well.
I modified the head rest of the 102D to reflect the one that was used in the Brazilian GP.


Made the seatbelts as well and finished the cockpits.


Front and rear wings assembled:
The Lotuses are 99%! I spent the entire evening wiring the electrical box and putting the rest of the car together. Only thing that remains is the mirrors and antennae! I might also add some etched rivets after but I'm not sure if I want to bother with those to be honest. Next two days will be the same steps on the 102D.
Only thing that's a bit disappointing is that the A/N fittings on top of the gearbox are now preventing the engine cowling from sitting properly (to an even greater extent I suppose).

And that’s a wrap! Check out the Gallery by clicking on the image below:
