DTM 1/20 2018 Ferrari SF71H Build Part 1
DTM (Model Factory Hiro) 1/20 Multi-Media kit.
This build was started in January 2019 and is currently ongoing. I have reposted previous WIP posts here.
Just received this in the mail yesterday. I've been guilty of being too lazy to create WIP posts here so I figured I'd start one now. I've got very limited MM experience so I'll be taking this VERY slowly so don't expect frequent updates.
First impression is that the resin is VERY light, unlike any S27 resin kit I've seen. The kit is very well engineered and doesn't actually look too hard to build, not much work should need to be done on the body (as opposed to that freaking Monopost W08 for example). Painting will actually be easier than the Tamiya SF70H kit since the red upper portion of the body separates from the carbon fibre underside, unlike the Tamiya kit which requires complex masking. You'll only have to mask the engine cowling fin if you don't trust the provided decal to be fully opaque.
Biggest thing for me will be creating CF decal templates and applying all of it. Pretty intimidating.
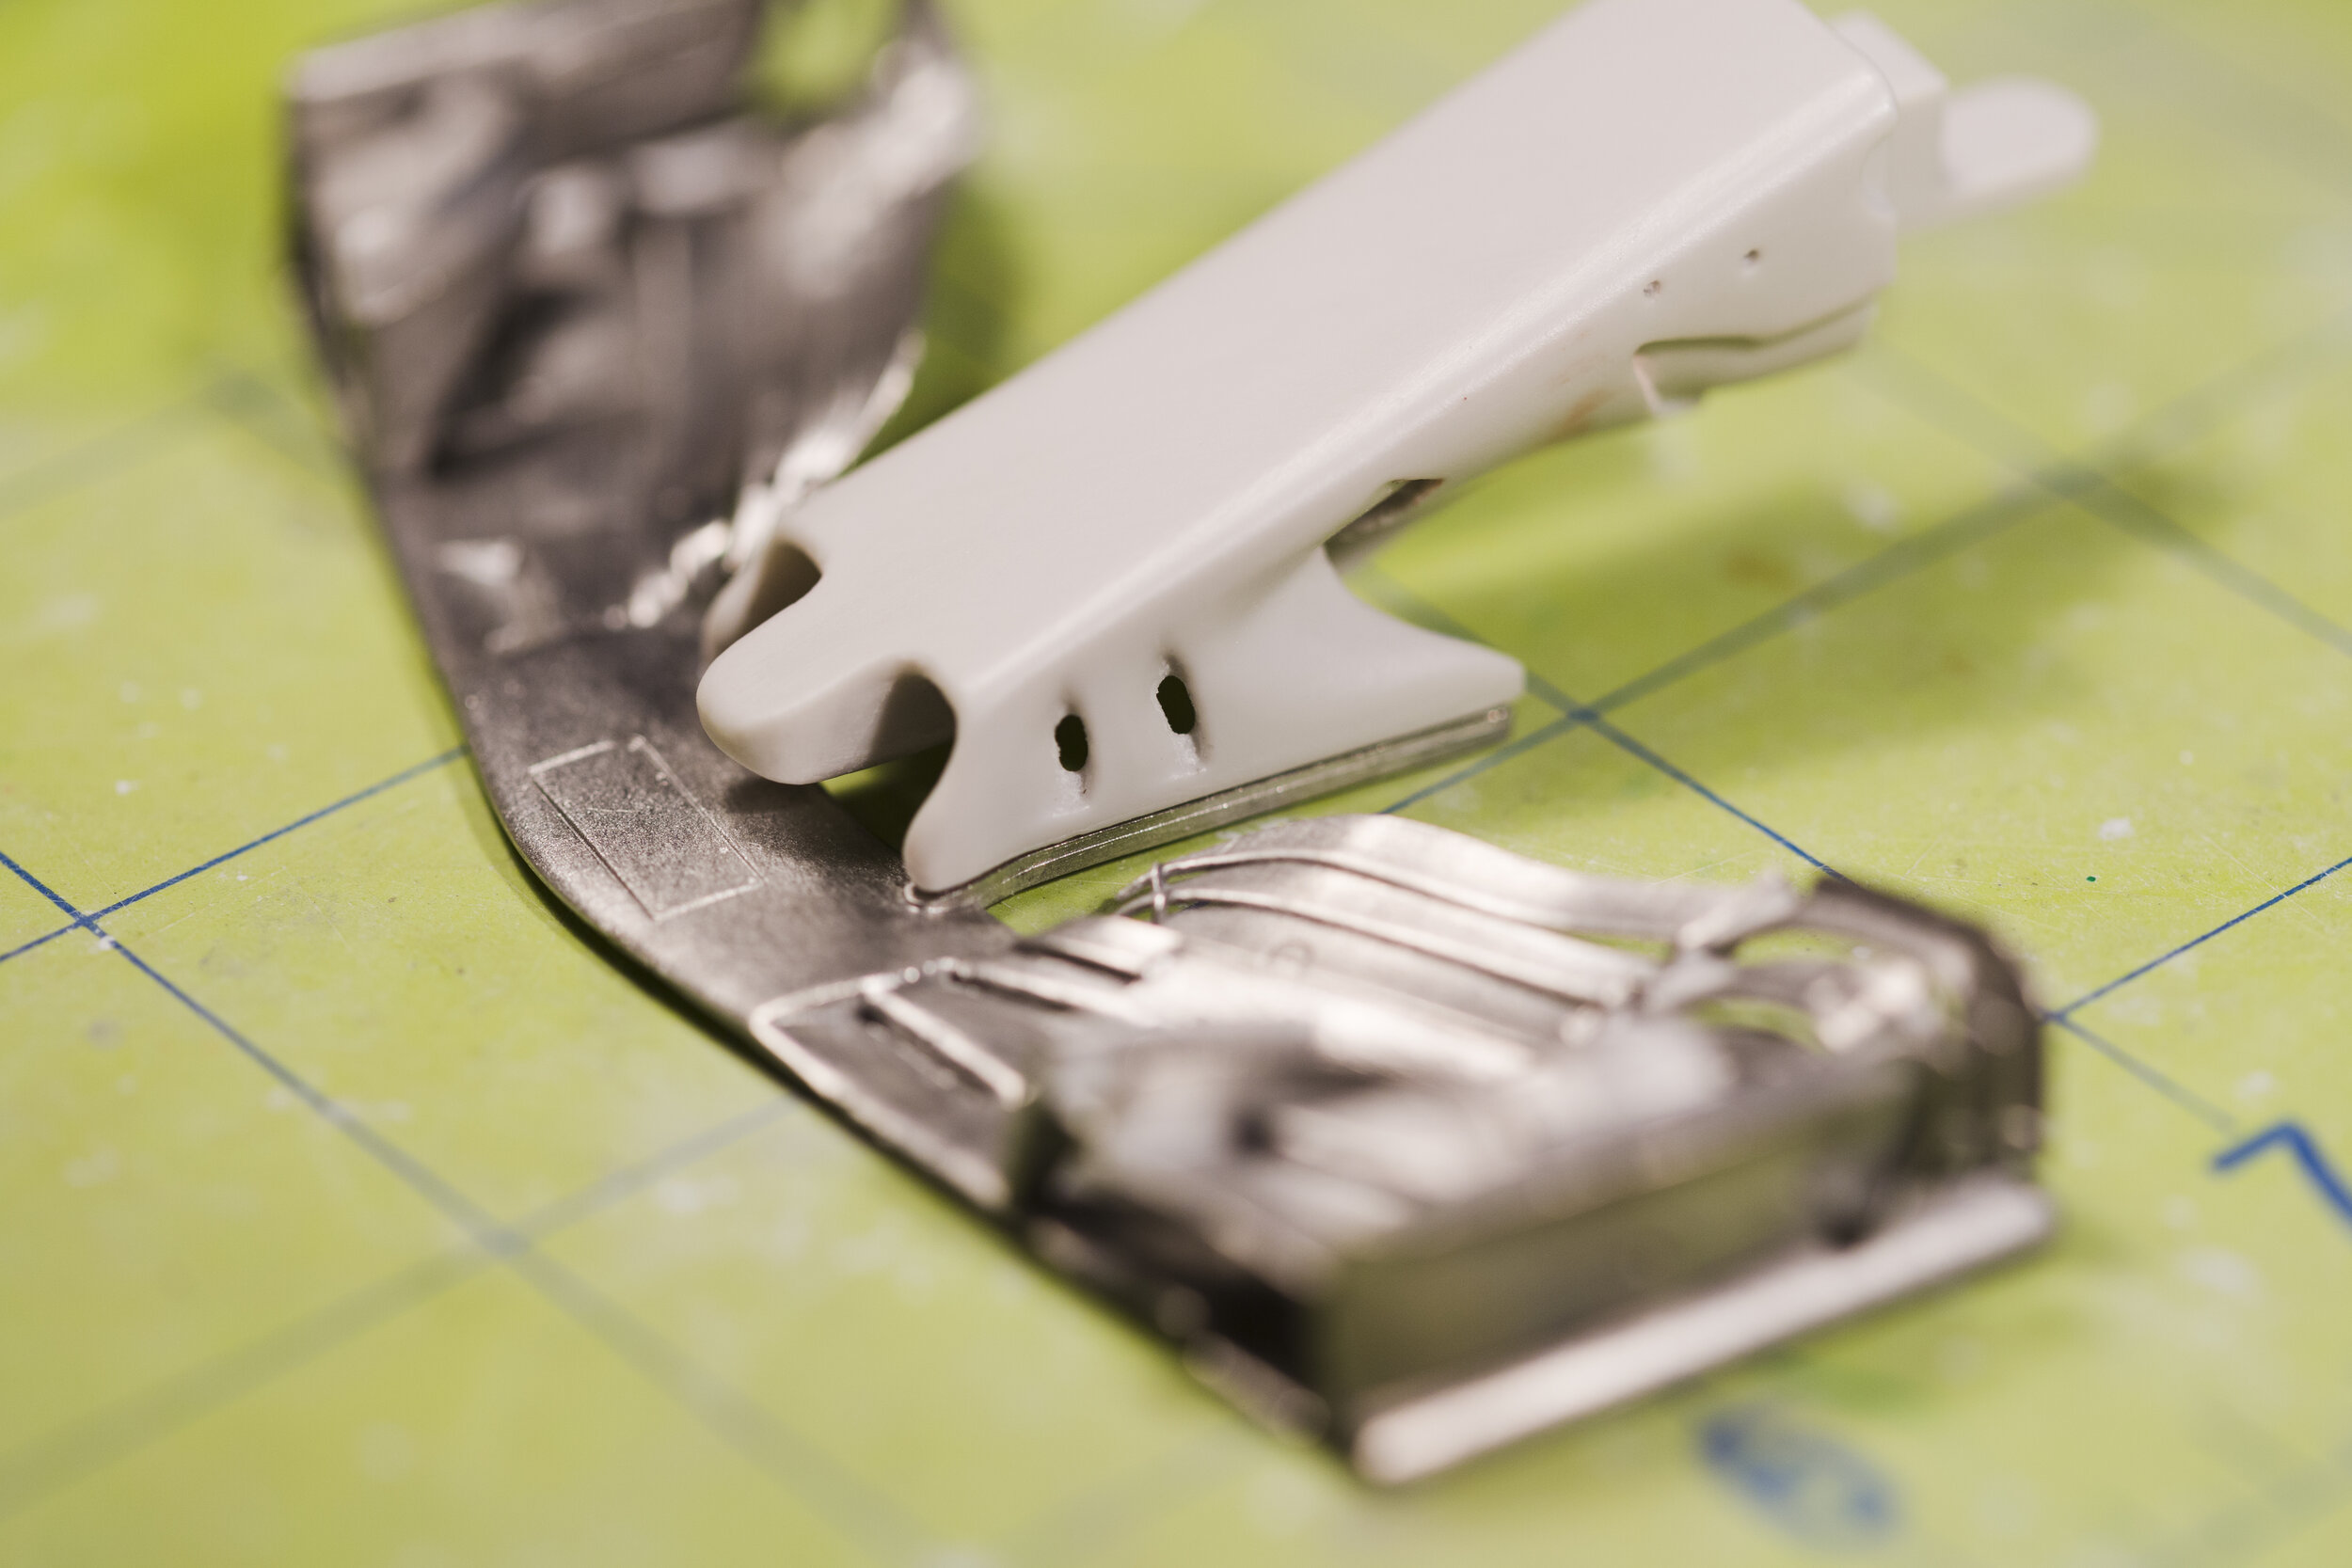
White metal parts vary in terms of quality of fit. Worst part is probably the air intake:
Few other parts stick out a bit due to resin shrinkage:
The fin piece is VERY nicely done.
Everything else seems in order though. Quite a lot of flash on the resin body but nothing out of the ordinary.
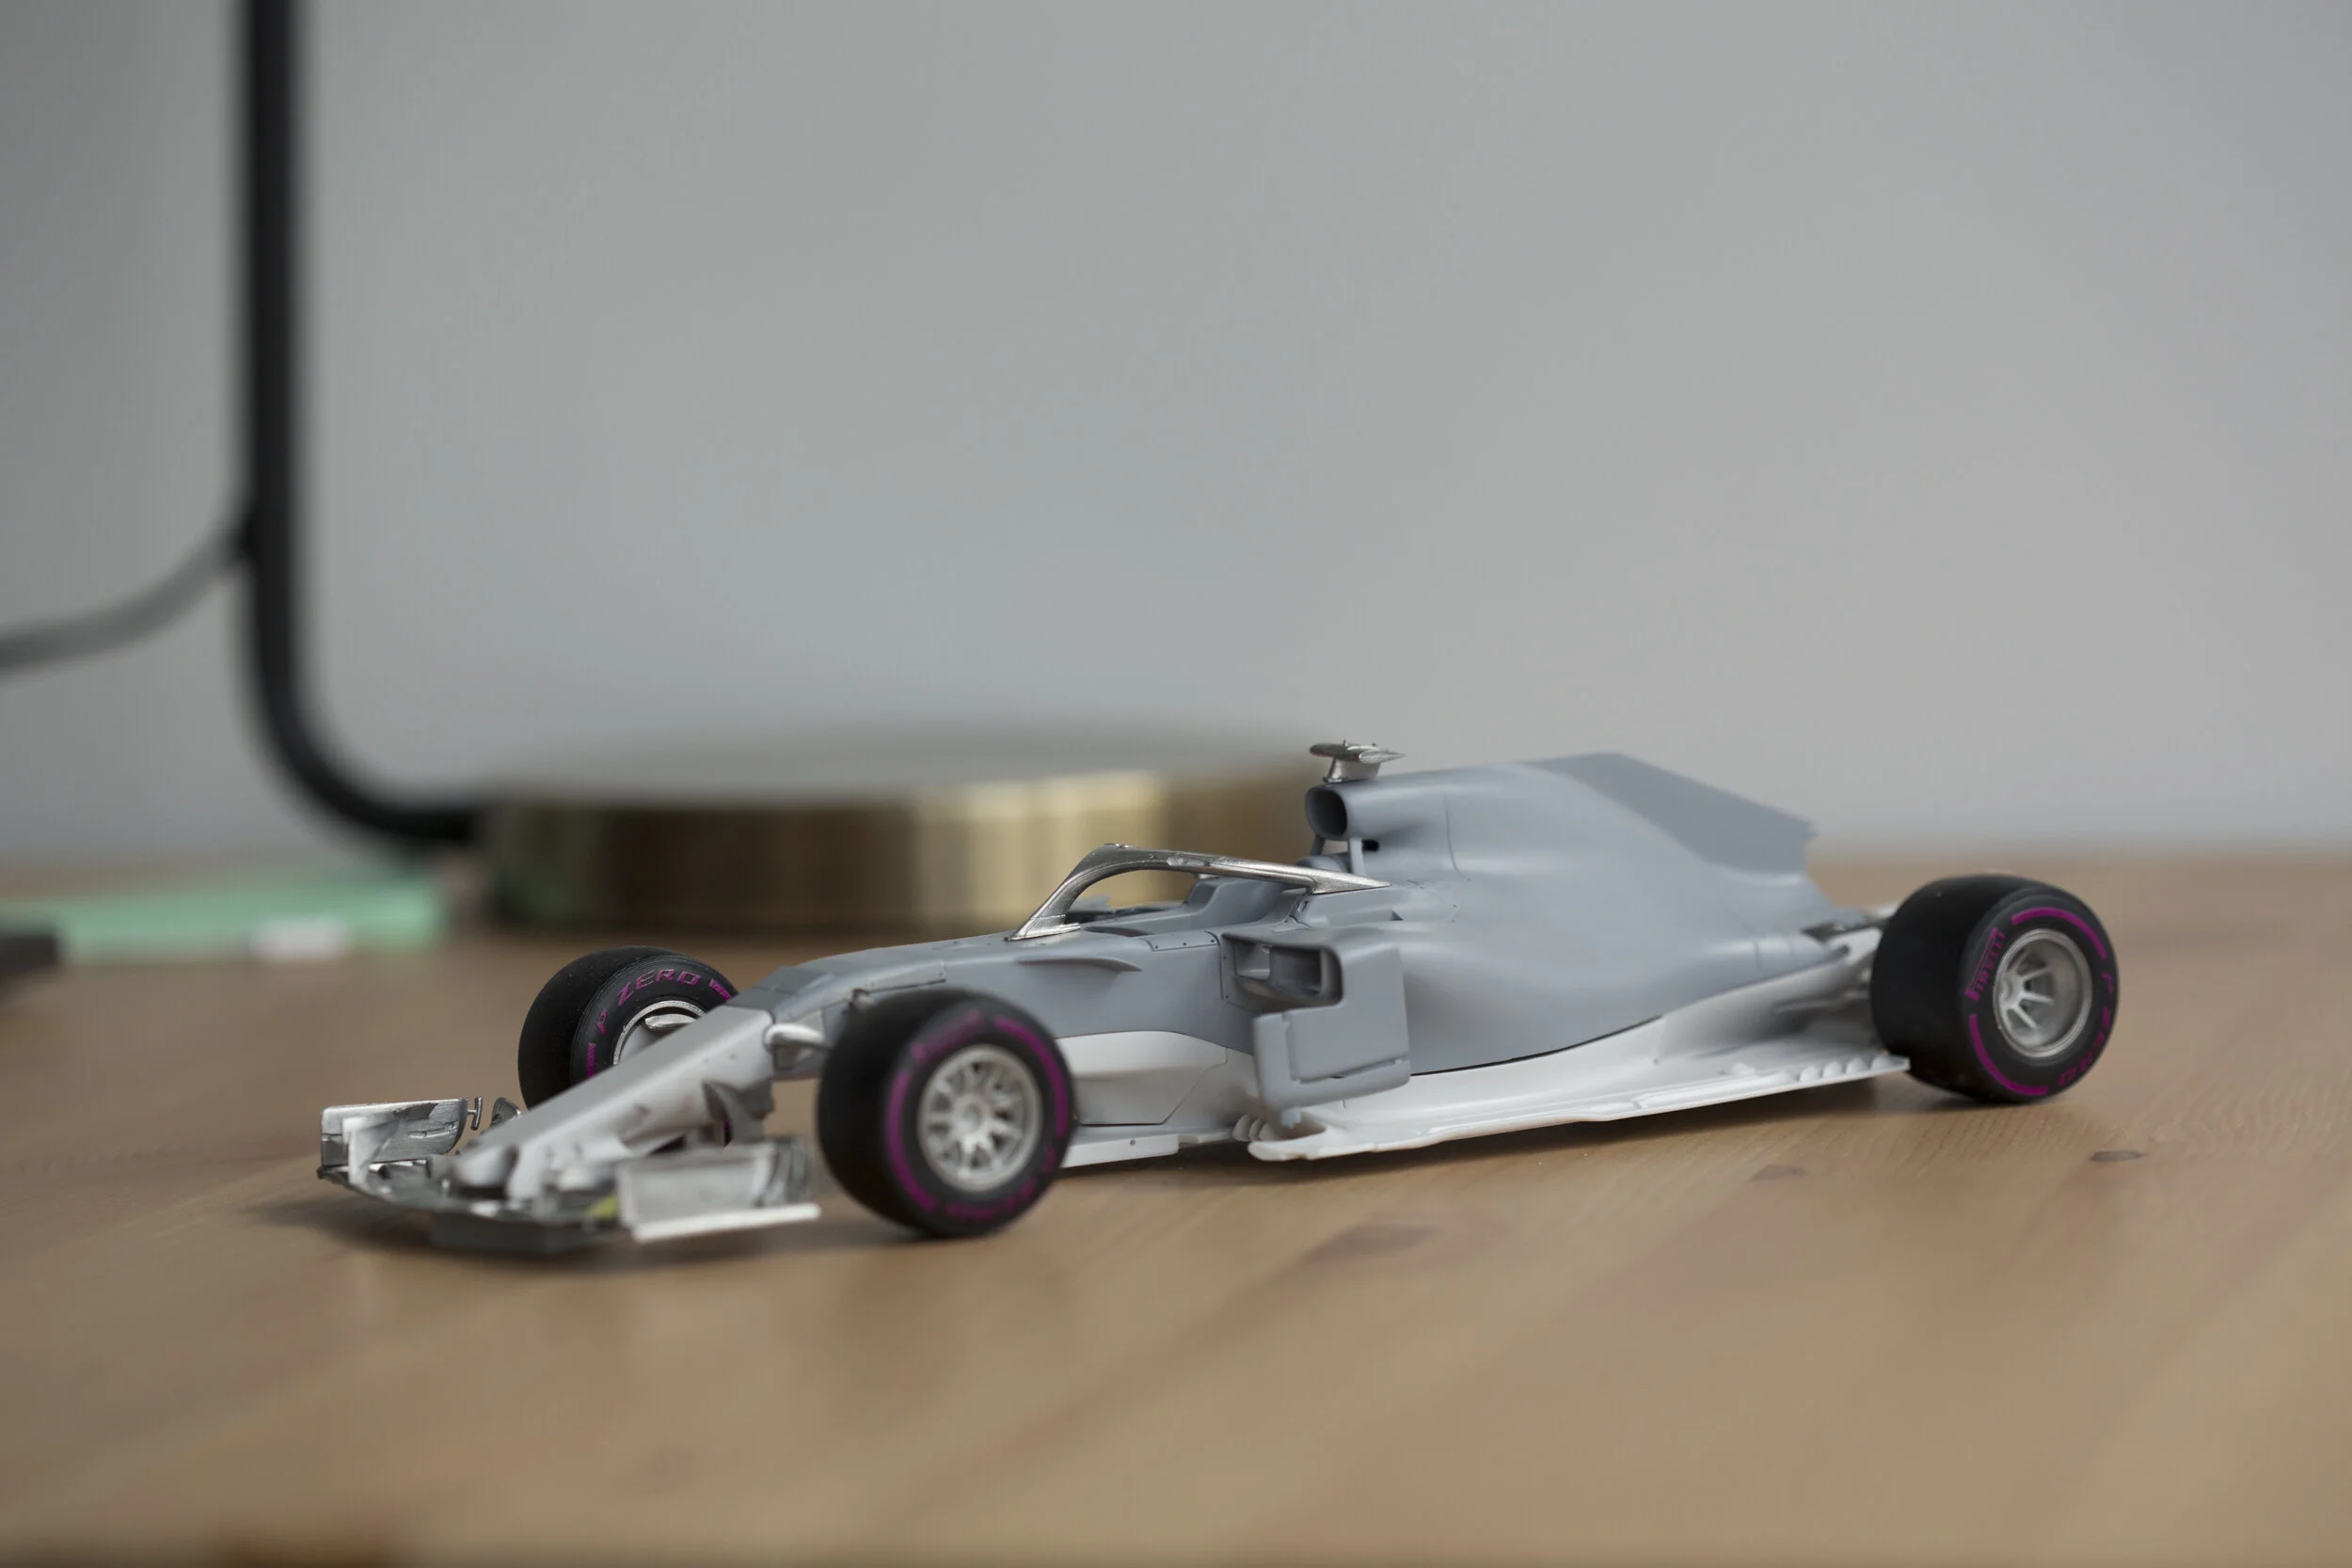
Partial mockup - pretty exciting!
The DTM SF71H kit seems to have much better shape than the Monopost W08 kit (as it should) but honestly the fit seems worse overall. The parts on the underside of the monocoque are noticeably wider than the upper part.
I blended this part which was slightly too large, that was a small pain. I'd have rather they let you attach the wings and then fix the gaps around that than this whole portion which is meant to be smooth and flat.
Currently trying to solve the airbox gap by putting some styrene to support the white metal, help guide it into position when I glue it down, and give epoxy putty something to sit on.
Yes, the entire back of the airbox is covered in styrene. That's how big this gap was.
A bit more shaving and twisting. Gap in the front is pretty big but I'll fill it and re-scribe the line after.
Still just taking this one slowly when my other kits are blocked.
Why, for my first MM kits, did I decide to tackle my two most complex, rare, and expensive kits? Jeez. Well I've started now so there's no going back.
Integrating the airbox was and is a huge ongoing pain.


I also realized a little late that the left camera mount needs to be removed for the Monaco GP version. Sanding down the white metal stub was not a fun task.
Integrating the fin was a bit more difficult than I expected since the resin has a little "ridge" built into it that hugs the fin.
The nose needs a lot of clean-up. First step is to open up the slots on the wing support.
One big issue with the nose/wing: take a look at the way the white metal is attached to the nose. The metal strakes and associated seam should not exist, so I’ll have to meld it together.

The 1/12 resin kit has accurate mounting points, so I guess the 1/20 kit was done like this due to the weight of the white metal? I'm thinking of cutting off the white metal strakes, gluing them to the nose, blending and sanding it, and then hoping that two small pins and epoxy will be strong enough to hold the wing in place.
Rest of the body went through some priming to expose any imperfections.
Fin looks mostly okay, it's not perfect but I think it'll look fine once it's coloured and cleared.


This piece on top of the nose continues to be a big pain. It looks fine on the left side but the right side is very hard to smooth out, especially behind the little winglet. I don't think I'll be able to get this perfect. Also, the edges between the white metal and the putty/resin are smooth, but in the light you can see a slight bulge since the metal piece is wider than the resin.


Airbox camera mount smoothed out nicely
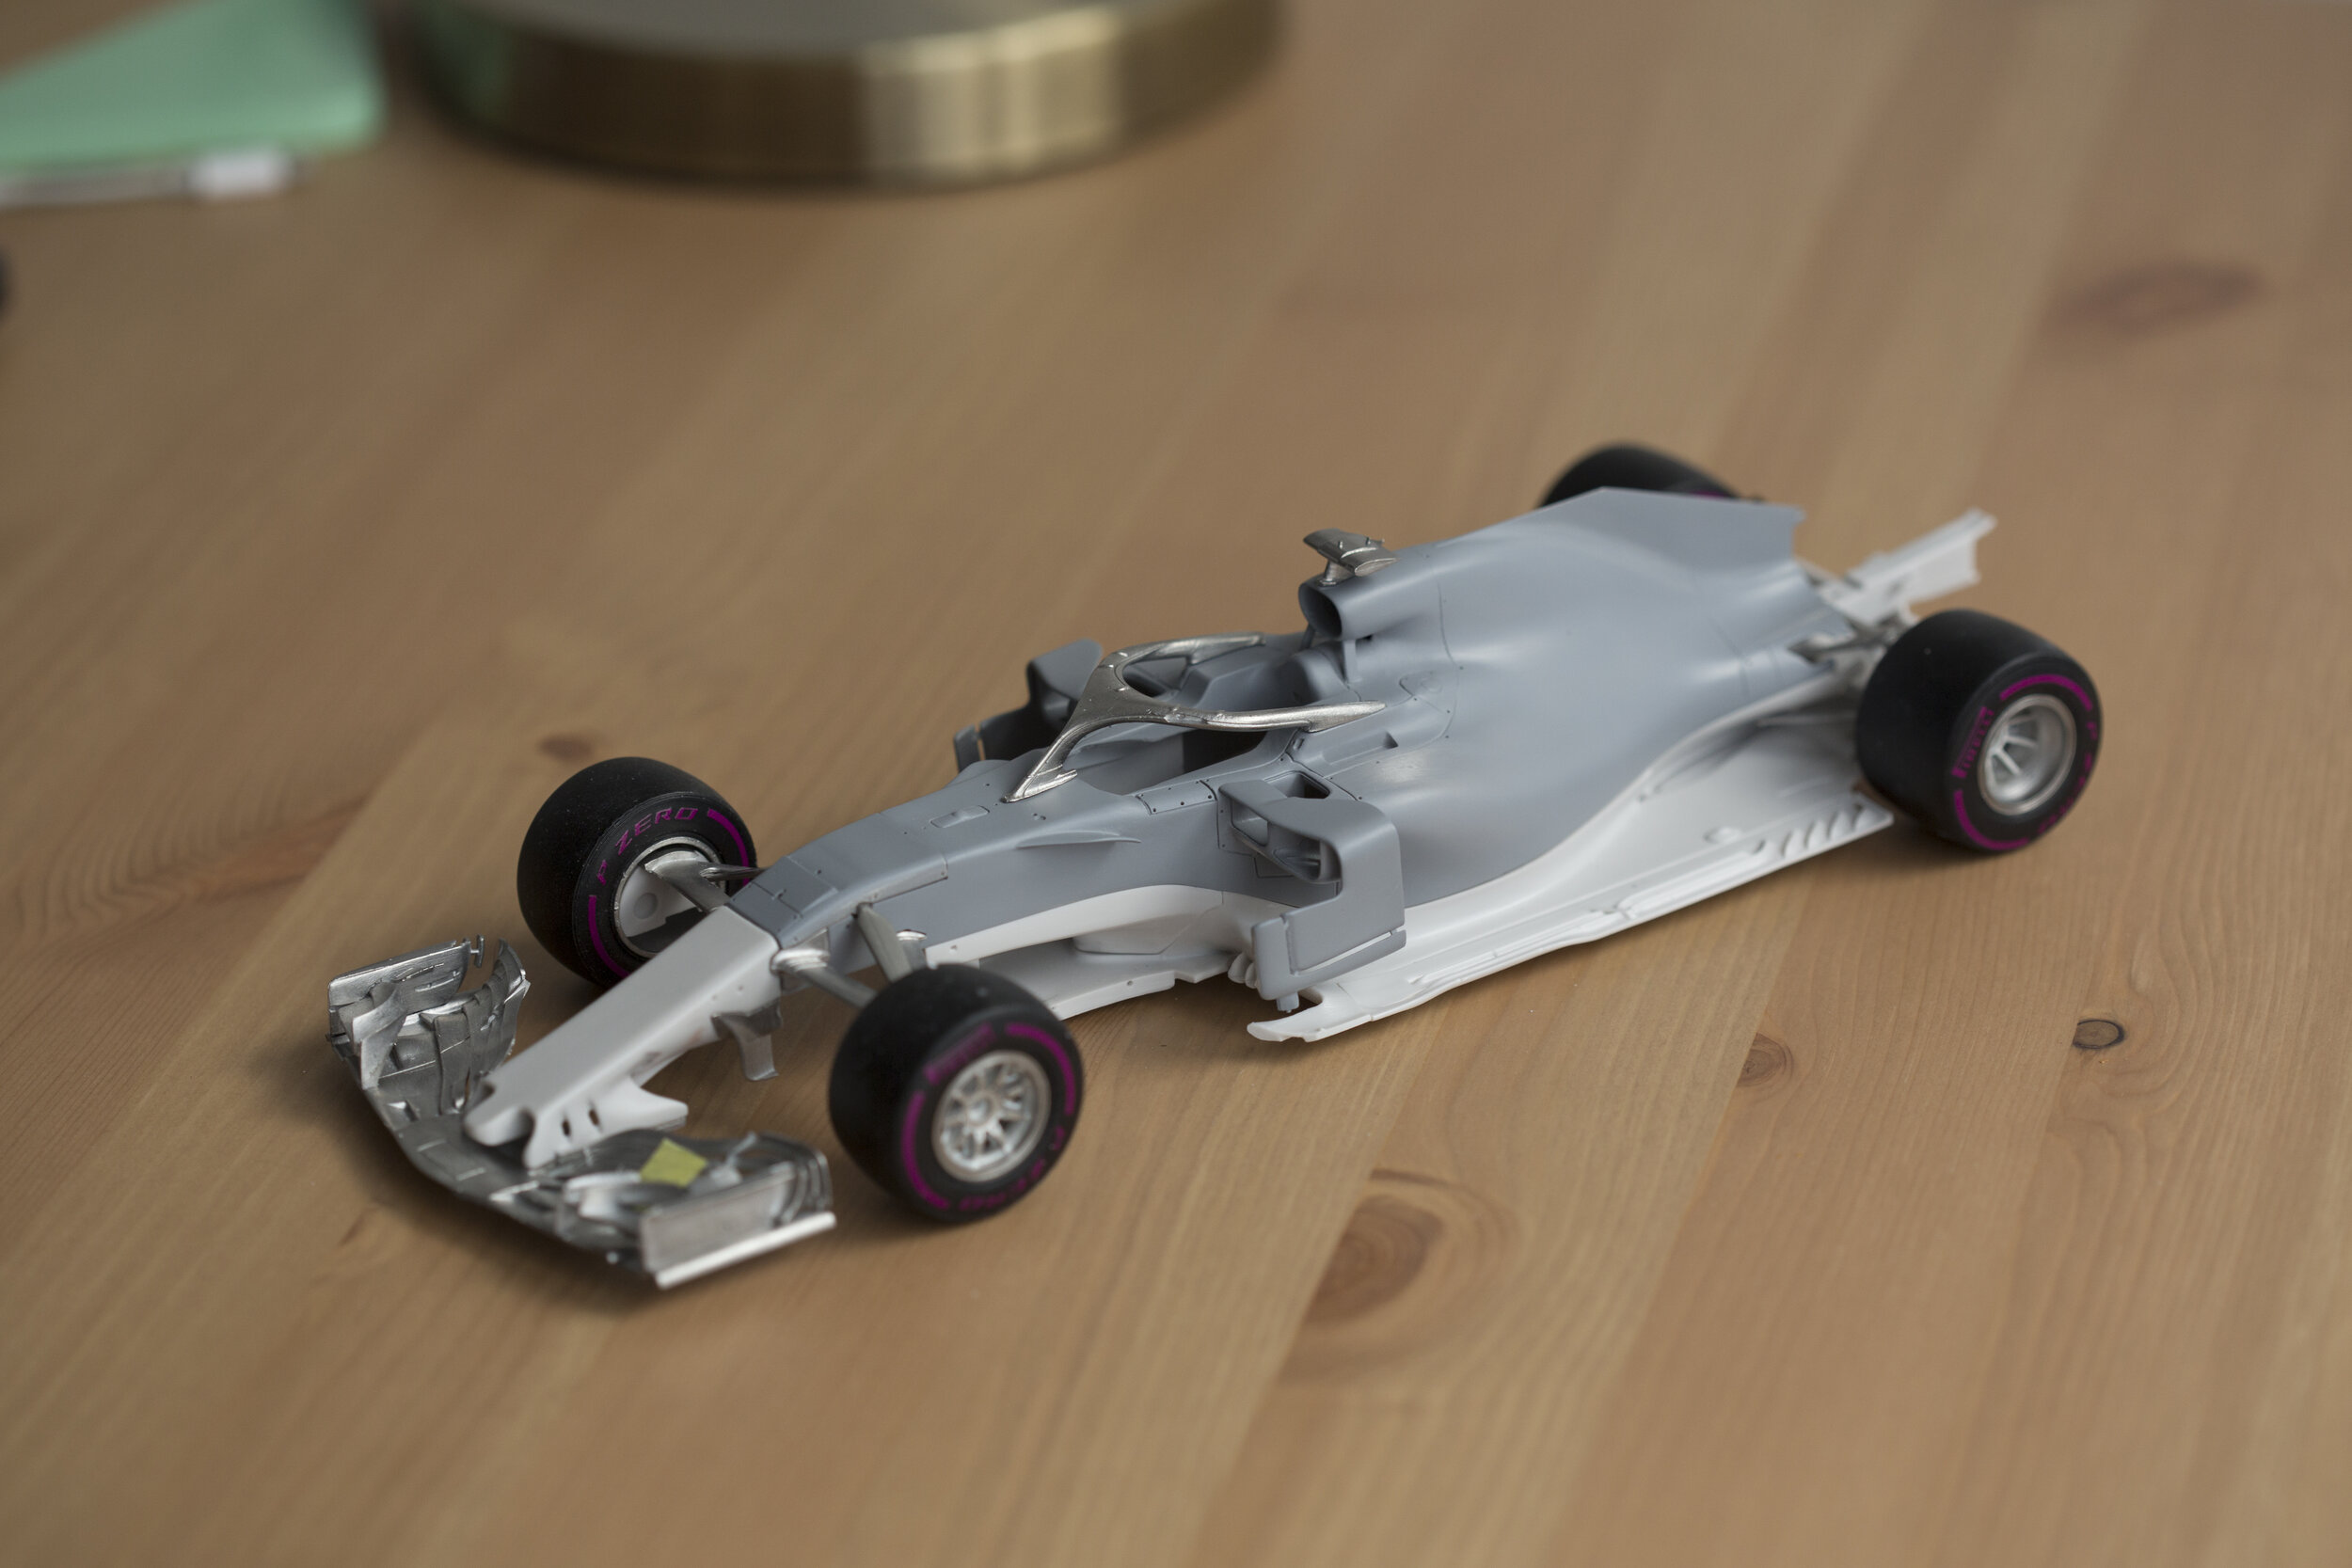
Dry fit:
The floor has some awful fitting pieces. The middle section looks worse than it actually is since it's being propped up right now, and the screws will close the gap somewhat. You can't see in this picture but the rear under-body piece that goes under the transmission pretty much doesn't even attach to the mid-section.
This piece is the worst offender in the kit so far in terms of fit. I've already shaved off about 1mm on both sides to get it closer to the witch of the monooque. Not sure how I'll fix the widtch and the gap on the lower part where it attaches to the floor though.
I also want to take this opportunity to call out the weakest part of this kit BY FAR: the tyres. Highly disappointed with them, especially since I mainly wanted to the Monaco spec to get ultra-soft tires. The colour is closer to magenta and purple as if they wanted to mix ultra and hyper soft tyres. And look at the alignment of the prints! Only the top right is aligned properly. Look at the rear tyre on the bottom right, it's not even close. I've seen other pictures of this kit online and it seems like mine is not unique in this respect. To add insult to injury, 2017-2018 spec Pirelli tyres shouldn't have the print on the inner side of the rear-tyres. The provided rears have print on both sides. Sigh. My hope is to acquire spare Tamiya SF70-H tyres and use S27 Pirelli decals for pink hyper-softs, since these are just unacceptable.


All right it's been almost a year now! Since the Lotus 102s are out of the way, it's time to make a push to make some big progress on the SF71H. Don't wanna fall too far behind the modern F1 kit release cycle.
I mentioned having to do this in previous updates but never posted the photo - I cut the strakes off of the wing main plane and blended them into the wing supports on the nose:
Some white metal pieces were awful in terms of smoothness and sink marks. Prepping white metal is still my least favourite activity. Over the past week I was making a push to have all parts that will have the red body colour on them primed and ready for base coat.
I painted the fin white and created a mask for the white decal. I don't want to risk the red showing through the white.
First time using pink primer! Decanted Tamiya spray can and shot through my airbrush. I've heard mixed opinions on SF71H red. To my eyes it looks extremely similar or the same as SF70H red but whatever. Maybe the SF71H is more pure red? My SF70H was primed with white, I'll prime this in pink and if it affects the final colour then so be it.
The front suspension parts have a part of the body attached to them to ensure good fit (which it succeeds at doing), but that means I need to prime and paint these little pieces at the end of the arms as well. A little annoying.
I painted all red parts with Zero Paints SF70H red tonight, unfortunately the halo piece fell off of an alligator clip while the paint was fresh and it ruined the paint, and the piece that has the S-duct exit on top of the nose/monocoque made contact with another piece while its paint was wet, causing a chip in the paint through to the primer. I might have to completely redo those parts but I'll wait to post pictures until those pieces are ready. Hopefully I'll be able to post consistent updates from here on out!
Painted! All parts that will have any hint of red has been painted in Zero Paints SF70H red. As mentioned in the last update, I had to re-prime and re-paint that top metal piece that sits above the front suspension. To the naked eye it seems like a fraction of a shade brighter red now unfortunately, but it's so minuscule that it doesn't show up in photos. Otherwise it looks great!
The shark fin mask came off nicely as well. The included decal includes the entire white piece so I'm debating if I should lay the entire thing on top of the white portion or cut out the individual graphics and put them on.
I masked and painted some of the parts that will be covered in carbon. This took a lot of time and I'm surprised I had zero incidents of paint lifting upon removal. I hope to spread out my CF templating and application so I don't get burnt out trying to do it all in one phase as with my W08.
Quick mockup of the front-end - beginning to look like a real car!
Overview


And today I began applying the silver stripe decals along the body. I was debating masking and painting but I don't want to risk anything. The decals were very thin and easy to manipulate so I have no regrets at this point.
I feel like I've made an incredible amount of progress this past week, I'll try to keep my momentum. The next phase (decals) will be massive though so we'll see.